
- Connect to Windows Virtual Desktops
- There are two options- Install the Client to your computer or use the HTML Access.
- If you choose HTML Access, please scroll down to Option 2
Option 1: Use the VMware Horizon Client
- To add the View Server, Double click on Add Server (once this is done the first time, you won’t have to add it again)
- Type in ece-vdi-connect.ad.ufl.edu – then click Connect

- Enter your UF Gatorlink credentials
- Most of you will only have access to the Student Windows 10 VDI so it will log you in directly to one of those desktops. Otherwise, the next screen will show you the Desktops you have access too.
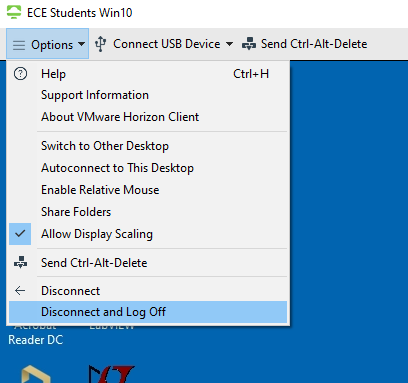
- Disconnect and Log off. When you are done with the session Choose Options at the top of the screen and choose the Disconnect and Log Off option. Note: Choosing just the Disconnect option will disconnect your session but jobs will remain running. This allows you to continue to do other things and come back to the running jobs on the VDI later. Note: there is currently a 2-hour limit to this. If you don’t reconnect in 2 hours your session will be logged off. A good example is if you connect on your laptop at Starbucks, start the job but need to run home. Disconnect and reconnect when you get home.
- When back to the connection screen, Disconnect from the Server.
Option 2: HTML Web Client
- Login using your Gatorlink Credentials (do not add @ufl.edu at the end)
- Choose the Desktop Pool for which you are trying to use. If you only entitled to one pool it will log you into that desktop automatically.
- When done, Log out.
For assistance with this please create a ticket by sending an email to support@ece.ufl.edu.